17.11.10

Don't miss: special appearance at the culinary event Fourchet Vedet!

In the last post I was revealing my secret recipe for ginger & mustard Japanese dressing. I guess it's time for you to learn why do I cherish this dressing so much.

It's simply because it played an important part in me winning the Fourchet Vedet cooking contest two years ago. The winning dish was lamb sushi and miso aubergines paired with a zingy little watercress salad (with this amazing dressing on top). Don't even wonder if lamb sushi does exist - it doesn't, or at least didn't exist until I had the idea of making it.

Why invent this dubious dish then? Because the aim of the contest was to cook a creative, tasty & beautiful Asian-inspired dish in less than 1 hour, using 4 mandatory ingredients and adding a maximum number of other three ingredients. Needless to say I wished for salmon and all I got
was lamb.


The next year the theme was Turkey and lamb was again on the menu. I asked for
my friend's Călin help this time and we served the lamb sliced in between crispy brick pastry with quince jelly and a pistachio sauce. We won again.

But that was it. I couldn't stand seeing lamb again. In preparation for the contest we must have cooked about 10 kilos of lamb, in any imaginable and unimaginable way, experimenting with countless flavours and cooking methods. I wanted to make a deal with the organizers: they give up the lamb and I give up participating & winning their contest.

Someone must have read the frustration in my eyes. Apart from the lamb, I really enjoyed their contest and I wanted to be part of the fun. And the organizers had a great idea: to put me in the jury! I finally get to say: "dzee aciditee of dze wine combines verrry well with dze euh... dze earrrthiness of dzees mushroom"...

So if you want to see me doing my French accent or if you wonder what will replace lamb this year, come see the show this Saturday, starting at 2 p.m. The cooking contest is part of a bigger event involving tasting of dishes from around the world and it's free. It will also rain on Saturday, so there's nothing better you could do.

Address & other infos on the
site of the event.


Contest photos by my faithful and patient photographer Lucian.

16.11.10

Wasabi beef & plums salad

Though it sounds fancy like everything else on this blog, this is a salad very simple to make. But as you might expect it's a very special one too. The big secret lays in the dressing: an explosion of sweet, salty and spicy of which you can never have enough. Or at least I can't.


Wasabi beef & plums salad for two
2 x 150g beef steaks
1 tsp wasabi paste
1 tbsp olive oil
1 bag mixed salad leaves
4 plums
1 small red onion
bunch of radishes
toasted sesame seeds

Ginger & mustard dressing
1 tbsp grated ginger 1 tbsp grainy mustard
1 tbsp soy sauce
1 tbsp rice vinegar (or lime juice)
1 tbsp mirin (or 1 tsp brown sugar)
2-3 tbsp olive oil
salt & pepper


1. Season the beef steaks with salt & pepper. Spread the wasabi on the steaks and marinate in the fridge for 30 minutes at least. They will change in color but wouldn't you if you were covered in burning wasabi?

2. Slice the onion and radishes. Pit the plums and cut in eights. Toss with the salad leaves.

3. Heat a frying pan over a medium-high heat. Sear the beef on both sides. You will need to adapt the cooking time depending on the thickness of the cut, but usually 3 minutes on each side is enough.

4. Leave the meat to rest for 5 minutes. Cut in thin ribbons and arrange on the salad.

5. Put all the dressing ingredients in a jar, replace the lid and give it a good shake. Pour over the salad. Sprinkle sesame seeds on top or go for gomasio.


Combine with rice for a very satisfying & healthy lunch.

This recipe makes 0.30kilos of pure goodness.

13.10.10

Chorizo & smoked almonds cake

When people ask why I stopped posting I always tell them that we moved and we are still fixing/arranging/changing things in the new house. Though for a period it was true (the stuff you desperately need is always at the bottom of the last box - like your favorite knife) almost a month has passed since we've settled and know in which drawer most things are.

But I'm never short of new excuses: good recipes need time in the making. Sometimes they need 3 times, sometimes 7. Like this cake.

I first read about it on David Lebovitz's blog who adapted a recipe from
Chocolate & Zucchini by Clotilde Dusoulier. I suspect many people already have a version of their own of this cake so here's my take on it. Instead of pistachios I used smoked almonds which add a deep, earthier flavour, and I added juicy chunks of spinach (nettles would work amazingly too). There are many variations still to be tried, like replacing sesame with poppy seeds or chorizo with prosciutto or adding cheese or olives and what not!


Chorizo & smoked almonds cake
1 1/4 cup flour
1 tbsp baking powder
1 tsp salt
1 tsp chili powder

1/2 cup plain yogurt
3 eggs
1 tbsp olive oil
100g spicy chorizo
50g dried tomatoes in oil
100g smoked almonds
2 handfuls fresh spinach or 1 cooked
2 tbsp sesame seeds

Preheat your oven at 180 degrees.

Mix flour, baking powder, salt and chili powder.

In another bowl beat the eggs, then add the yogurt and olive oil.

Fold the dry flour mixture into the eggs without overmixing.

Now dice the chorizo and tomatoes. If using fresh spinach, throw it for a minute in boiling water until it softens. Squeeze the excess water.

Gently incorporate the chorizo, tomatoes, spinach and smoked almonds into your dough.

Butter a cake tray. Scatter half of the sesame seeds in the tray, making sure you put some on the edges as well.

Pour the dough, level it and cover with the rest of sesame seeds.

Bake for 40 minutes, until golden but still moist.

You can keep the cake in a plastic bag for a few days but it won't last for so long, I'm sure.


This recipe makes 0.75kilos of pure goodness.

29.7.10

Coconut milk mussels

There's nothing more Belgian than digging hands first in a bowl full of fresh juicy mussels. Shamefully I never cooked mussels the Belgian way. Since I first made coconut milk mussels everybody was hooked and it became the superquick dish that never fails with guests. Including guests who never eat seafood. Or coconut milk.


Coconut milk mussels for 4
2 kilos cleaned fresh mussels
1 tbsp oil
2 shallots
3 cloves garlic
thumbsized piece of ginger
thumbsized piece of galangal (optional)
2 - 4 thai chilis
1 tbsp ground turmeric (optional)
4 stalks lemongrass
2 tomatoes

2 tbsp fish sauce (or soy sauce)
juice from 2 limes
4 kaffir lime leaves, cut in very fine strips
handful of chopped herbs (coriander, thai basil)
400 ml coconut milk

Cut the shallots, garlic, chilis, ginger and galangal in large pieces. Whizz them in a food processor until you obtain a paste.

Take the largest pot you own and make sure it has a lid that fits snuggly.

In a little oil fry the paste until it starts to smell very nicely. Pour over the coconut milk. Add the turmeric if using.

Bruise the lemongrass stalks with the back of a knife, cut in two and throw in the sauce. Simmer for 5 minutes.

Peel the tomatoes, cut in dices and add them to the pot.

When the tomatoes are soft, add the mussels. Turn the heat on maximum, cover with the lid and wait 3 minutes without lifting the lid.

Check if the majority of mussels have opened. If not, replace the lid for another 2 minutes. Discard any mussels left unopened after this time.

Take away from heat and fish out the lemongrass stalks. Gently stir in the fish sauce, lime juice and the herbs. Sprinkle with kaffir lime leaves. You can add more chili - we always do.

Distribute the mussels between 4 bowls, ladle the coconut sauce on top and serve with fluffy thai rice.

This recipe makes 0.5kilos/person of pure goodness.

19.7.10

Mojito mousse

After a birthday party where the main attraction were a few liters of mojito and after a friend's request to start cooking with tequila, the idea of a cocktail mousse came only too naturally. The base is a lime mousse in which you add the liquor of your choice: rum, cachaca, tequila or vodka and call it mojito, caipirinha, margarita or caipiroshka, respectively.

If you're not into having drinks with your dessert, you can leave out the alcohol and enjoy the mousse as it is: refreshingly delicious.


Mojito mousse for 8

1 tbsp gelatin
2/3 cup lime juice (~ 6 - 7 limes)
3/4 cup brown sugar

5 eggs, separated

2 - 3 tbsp white rum

1 cup whipping cream, chilled

2 handfuls fresh mint leaves

lime slices to decorate

Soften the gelatin in a little warm water.

In a small pan, whisk the egg yolks until smooth. Add the lime juice and 1/2 cup brown sugar and stir over a low heat until the mixture becomes like heavy cream in consistency (might take between 5 - 10 minutes). The mixture might curdle at the beginning, but don't let that intimidate you - it will come nicely together.

When you reached the right consistency, take away from heat and stir in the gelatin. Add the liquor and mix. Pour the mixture into a metalic bowl and let it float in a basin of cold water to reach room temperature.

Finely chop the mint leaves and add them to the mixture once it has cooled down.

Now beat the egg whites until soft peaks form.

Whip the cream until soft, add the remaining 1/4 cup of brown sugar and whip again until stiff.

Gently fold the egg whites into the cream. Add the lime mixture, one third at a time, stiring gently.

Pour the mousse into serving glasses, cover with cling film and refrigerate for at least 1 hour. To serve, decorate with mint leaves, lime slices or lime zest.

This recipe makes 0.2kilos/person of pure goodness.

25.6.10

Beef with chocolate sauce & peach purée

You're not a proper chocoholic until you put chocolate in a savory dish. Though I'm far from being utterly crazy about chocolate, I happen to have the odd craving now and then. This is the dish that came up when I craved chocolate AND a steak at the same time.

Beef with chocolate sauce for 2
2 beef steaks
2 knobs of butter
50g bacon
1 shallot
2 garlic cloves
2 cups red wine
1 cup unsalted beef broth
2 tsp whole peppercorns
a few sprigs of thyme
2 laurel leaves
2 tbsp dark chocolate broken in small bits
cocoa powder to decorate

Heat the butter in a casserole on a medium heat until it foams. Brown the bacon. Remove it from the pot and set aside.

Finely cut the shallot and garlic cloves. Put the shallot and garlic in the casserole and cook until soft.

Pour over the red wine and add the thyme, laurel leaves and whole peppercorns. Take the bacon and place back in the pot. Lower the heat and let simmer until the liquid has almost dissapeared.

Add the unsalted beef broth and reduce again. When ready, pass the sauce through a fine sieve to get rid of all the bits and pieces.

You should now have a few spoonfuls of concentrated and flagrant sauce.

With the sauce well away from heat, drop in the chocolate bits and stir well to dissolve. The sauce will become rich, dark and glossy. Give it a taste - depending on the chocolate you used, you might need to add a teaspoon of honey or brown sugar.

Now it's time to prepare the beef steaks. Pat dry and season on both sides. Heat the second knob of butter in a skillet and sear the steaks to your liking. Let rest for a few minutes while you reheat the chocolate sauce. Do it on the lowest heat and watch closely not to burn the chocolate.

Slice the steaks, arrange on plates and pour over the chocolate sauce. Sprinkle some cocoa on top and serve.


The chocolate sauce also matches wonderfully with lamb or venison, so get creative and experiment. You can also make a larger quantity of sauce and freeze it until the next special occasion (just add the chocolate afterwards).

Sweet potato & peach purée for 2

2 orange sweet potatoes
2 fresh peaches
know of butter
bit of salt

Bring some salted water to a boil. Plunge the peaches in for a few seconds and then cool in a bowl of cold water. Now the skins will easily come off. Peel, stone and cut in quarters.

Peel the sweet potatoes and cut in dices. Boil for 5 minutes, then add the peach quarters. Continue boiling until you can easily pierce the sweet potatoes with a fork.

Using a food processor, blend the sweet potatoes and peaches to a smooth purée. Stir in the butter and abandon yourself to the new taste.

This recipe makes 0.4kilos/person of pure goodness.

23.6.10

Grapefruit & lavender crème brûlée

I've been watching my big pot of lavender for about 3 weeks before I could decide on a great enough recipe to use the flowers in. By the time I made my decision, the buds were completely in flower which they shouldn't. I guess it has something to do with the flavour being more concentrated in bud form, but for this crème brûlée you only need a hint of flavour so flowers work just as fine. Besides they are more beautiful which is always a plus for superficial me.


Grapefruit & lavender crème brûlée for 6
1 pink grapefruit
2 cups heavy cream
7 egg yolks

3 tbsp cane sugar

6 - 10 fresh lavender buds

sugar to caramelise the tops (~3 tbsp)

Squeeze the grapefruit and place juice and any bits of pulp in a pan. Bring to a simmer and reduce liquid by half.

Add the cream and heat until bubbles begin to form at the edges. Remove from stove and drop the lavender buds inside. Let infuse for up to 30 minutes.

Strain the mixture through a fine sieve and discard the grapefruit pulp and lavender. They did their job in every way.

Blend the egg yolks and sugar until smooth.

Reheat the cream until very hot and add to the eggs one spoonful at the time. Stir well after each spoonful. Don't add all the quantity at the same time because the eggs will curdle and you'll end up with lavender scrambled eggs.

There are two methods of finishing your crème brûlée. One is to gently heat the custard mixture on the stove until it thickens and coats the back of a metal spoon (could take as little as 1 or 2 minutes) and then pour into ramekins. Refrigerate for at least 2 hours.

The other is to pour the custard directly into ramekins. Place the ramekins in a tray filled with water (lever of water should be the same as level of custard) and bake for about 40 minutes, until the edges have set and the centers are still wobbly. Keep in the fridge.

Unquestionably, the second method will yield a richer taste, but for those not lucky enough to own an oven like myself, the first method is a perfectly viable alternative.

Besides not owning an oven, I was always too lazy to invest in a torch and each time I find myself looking for peculiar ways to make the caramel tops. But the results look spectacular and the taste is the same, so why not?

Oil a big plate with lots of neutral-tasting oil. Melt the sugar on a very low heat until all crystals have disappeared. Using a spoon and some dexterity, pour a tablespoon of melted sugar on your plate in a spiral shape or whatever your favorite shape is. Be creative but remember the shape has to match the size of your ramekins. You might need to reheat the sugar a few times until you finish all the 6 tops, but the smell is nice and the activity quite enjoyable.

Keep the tops in the fridge until serving time. Mine have continued melting on a hot day and were quite hard to remove from the plate afterwards.

At serving time, place a caramel top on each ramekin and sprinkle with lavender buds. Yummy!

This recipe makes 0.15kilos/person of pure goodness.

20.6.10

Pineapple creamy pork

A superfast way to cook pork and a very tasty one too. Pork meat pairs exceptionally well with fruit and today's choice is juicy ripe pineapple, soaked in a luscious sweet and sour sauce.

Pineapple creamy pork for two
4 - 6 lean pork fillets (tenderloin is best)
1 onion, diced
1 knob of butter
1/2 ripe pineapple, diced
1 - 2 tbsp sultanas or dried plums (optional)
1/2 glass sherry/white port
1 tbsp fresh thyme
200ml cream
salt & pepper

Heat the butter in a skillet until it foams. Pat dry the pork fillets with a paper towel and sprinkle on both sides with salt & pepper. Sear on medium heat until brown, about 5 minutes on each side. Remove from pan and set aside.

In the same skillet add the onion (you might need a bit more butter). Turn the heat down to low. Gently fry the onion until it turns very soft, sweet and sticky, like an onion confit.

When the onion is meltingly soft, deglaze by adding sherry. Use a spatula to scrap the pan and displace any tasty bits that might have stuck to the bottom. Add the pinneaple dices and sultanas. Scatter thyme leaves on top. Return the pork to the pan with its juices and cook for 15 - 20 minutes. Add some water if the liquid evaporates too quickly.

Last thing is to add the cream, stir and taste. If strangely not sweet enough, you can drop in a dollop of honey.

Serve with rice, vegetables of your choice and lots of sauce. Delicious.

This recipe makes 0.4kilos/person of pure goodness.

14.6.10

59kilos.com appears in Brussels Unlimited

Just about one week after I started this blog, I received an email with a very attractive proposition: to talk about my life in Brussels. The interview would be part of an impressive project, that would span for 27 weeks and feature 27 nationals from each European country. I was to represent Romania - not a relaxing thought at all.

The interview day finally come, it wasn't as terrifying as expected. At the contrary, we spent a really nice afternoon chatting about lovely places in Brussels, about what it means to move abroad and how long does it take to call a new country home.

If you live in Belgium, you can read the interview in this week's edition of Brussels Unlimited, a magazine packed with lots of useful information. Or go online to Ana-Maria's blog anamariameets.eu where you can watch the video as well.

11.6.10

Mediterranean beef brochettes with parmesan polenta

What would be a sunny summer day without a barbecue? Try new bold flavours with this recipe that combines juicy beef with zingy fresh lemon. You can substitute beef for lamb or even salmon.


Beef brochettes for four
500g ground beef
breadcrumbs from 1 slice of bread
1 egg

1 small onion

2 tbsp capers

1/2 cup white wine
juice & zest from 1 lemon
handful chopped black olives
oregano
parsley

1 tsp salt
ground black pepper


Finely dice the onion. Heat a tablespoon of olive oil in a skillet and saute the onion on medium heat until it softens. Add the capers, lemon juice & zest and the white wine. Cook for a further 10 minutes, until almost all liquid has evaporated. Let cool.

Mix the the ground beef with breadcrumbs, the egg and the onion mixture. Add the olives and chopped herbs. Season well with salt & pepper.

Form balls the size of a walnut and arrange on a plate. Put them in the fridge for at least one hour - this will harden the composition and prevent your brochettes from falling apart during cooking. The longer you leave the flavours to blend, the tastier your brochettes will become.

While the meat is in the fridge, fill a pot with water and soak some wooden skewers. This way they won't burn on the barbecue.

Slip 3 balls on each skewer and barbecue until nicely brown on all sides. If you're unlucky and it rains, you can also grill the brochettes in a bit of olive oil, in a pan.

Parmesan polenta for four
300g corn semolina
3-5 cups hot water

1 tbsp olive oil
or knob of butter
100g gratted parmesan

1 tsp salt


A good polenta takes time to make, but the good news is that you can prepare it way ahead and keep in the fridge until serving time.

What you'll need is a pot filled with salted boiling water. Drizzle the corn semolina really slowly over the boiling water and stir well. And when I say drizzle, I really mean it. The trick is to pour the semolina constantly and in a fine rain, otherwise you'll get lumps.

Lower the heat (almost to a minimum, or it will splatter) and keep stiring. You're going to be there for at least half an hour, but it's very important not to stop stiring. The polenta can stick to the bottom of the pot and burn. Add more hot water when necessary.

The polenta is cooked when it peels off the sides of the pot. The consistency should be creamy but some people like it firmer - it's up to you.

Now you can take the polenta off the heat and stir in the olive oil/butter and gratted parmesan. You can also add a sprinkle of dried mediterranean herbs.

If you plan to serve the polenta later, pour it while it's hot in an oiled baking tray. Leave it to cool. Later you can cut it in squares and heat those for a couple of minutes on the barbecue. It is also very good cold.

This recipe makes 0.4kilos/person of pure goodness.

7.6.10

Street style food at the Thai market in Waterloo

I found a flyer advertising the Thai market in a restaurant, sometime last year. As I had difficulties finding rare Thai ingredients in Brussels we thought we should give it a try.

Big was our surprise when we landed not in an ordinary market, but in a blooming garden crammed with stalls where countless cooks were agitating woks, barbecues and simmering soup pots. The fragrant smells instantly transported me back to Asia - and I haven't even eaten yet.

The quantity and variety of dishes on offer was unimaginable: spicy rice noodles soups, prawn stir-fries, coconut milk curries, Thai sausages and dried pork meat, dried fish, chicken & herbs salads, picked cabbage, pad thai, grilled meats, steamed or fried dumplings, sticky rice, fish cakes and a stack of divine desserts I never suspected the existence. Everywhere you looked there was yet another delicious treat to discover.

Needless to say, when we finally left, our bellies were aching but we were triumphantly carring a number of takeaway bags. The next day we were already fantasizing about going back for more supplies.

Some practical information: the market is held every first Sunday of the month in the garden of the Wat Thai Dhammaram temple. The action starts at about 10 in the morning and lasts as long as there are hungry people (till 2 or 3 o'clock in the afternoon). All dishes cost 5 euros. You can also shop for Thai vegetables, fruit, herbs and other foodstuffs. Sometimes, there are people selling traditional or handmade objects. People speak French, Flemish, English and obviously Thai. There are also special events involving music and glimpses to the Thai culture, so ask for the dates - everybody is very kind and willing to help. An upcoming event is Buddha Day on the 20th of June.

Address: Chaussée de Louvain 71, 1410 Waterloo, exit 26 from the Brussels RO ring. Parking is available at the Carrefour in front.

If you feel somewhat lost when you visit the market for the first time, look for friendly Mr. Sam. He will help you make sense of everything that's happening. His son runs a famous Thai restaurant in Brussels so he must know a bit about good food. He arrived in Belgium some 30 years ago and when he misses home, he comes to the temple and gives a helping hand with keeping the garden top notch.

See you there!

3.6.10

Strawberry jelly & vanilla panna cotta

Creamy panna cotta and sweet strawberries can only make a glorious summertime dessert. And they do, they do! It's been a while since something excited me this much :)

Beautiful things come indeed after a bit of effort. But big part of this effort is just keeping a close eye on quantities and proportions. Hopefully, now that I kind of settled on this recipe, your first try will surely be more successful than mine. The preparation should pose no problems, but keep in mind you'll need quite a lot of refrigeration time, so start early.


The one thing that might compromise this lovely dessert is using too less gelatin. The panna cotta won't set, you won't be able to unmould it and you'll be most certainly very upset. If you're in doubt about the quantity of gelatin you need, just use more.

Strawberry jelly
250ml water
50g white sugar
300g fresh strawberries

zest from 1 lemon
4g gelatin

Pick out the most handsome strawberries (count 2-3 per serving) and keep them safe. Mash the remaining strawberries into a paste.

In a pan, combine the water and sugar and boil until sugar is dissolved. Let cool. When the syrup has cooled down, drop the mashed strawberries inside and let infuse for 30 minutes.

Pass the liquid through a fine sieve, to get rid of all seeds and pulp. Now add the lemon zest.
Soften the gelatin in a cup of cold water for 5 minutes. Heat the strawberry syrup and add the gelatin. Stir until completely dissolved.

Chose the moulds you're going to use. I prefer flat bottomed ones, but any shape would do just fine. If you don't have moulds, use coffee cups or glasses. Oil them with a neutral oil, like sunflower.

Take the handsome strawberries and cut them in halves. Arrange the pieces at the bottom of every mould. Pour slowly the strawberry jelly on top. It should fill about a quarter of the mould.

Refrigerate for at least 2 hours.


Vanilla panna cotta for 6 - 8
400ml full fat liquid cream
200ml milk
50g white sugar
75g cane sugar

1 vanilla bean or 2 tbsp vanilla essence

9g gelatin
fresh strawberries to garnish


When your jelly has set (it should be very firm, not wobbly) prepare the panna cotta.

Mix the cream, milk and sugar and bring to a boil. Remove from heat. Split the vanilla bean lenghtwise and, with the back of a knife, scrap all the seeds in the cream mixture. Add the leftover bean and let stand covered for half an hour.

Fish out the vanilla bean. Soften the gelatin in cold water, reheat the cream mixture and stir in the gelatin.

Let cool to room temperature. This step is very important: if you would pour anything hot on top of the jelly, it will just dissolve and all your hard work would have been in vain.

Last step is to fill your moulds with panna cotta mixture and refrigerate for at least 4 hours. It's a good idea to cover the moulds with cling film, especially if you have garlic lying around in your fridge.

Red wine syrup
1 cup red wine
2 tbsp white sugar

black pepper


Just before serving, combine all the ingredients in a saucepan and simmer until the liquid has reduced to a syrupy consistence.

Unmould the panna cotta by immersing the moulds briefly in hot water and turn upside down on a plate. Garnish with strawberries and spoonfuls of wine syrup.

Dead good.


If you don't have enough time to prepare this dessert don't just give up: make the panna cotta without the jelly. It's just as delicious.

This recipe makes 0.2kilos/person of pure goodness.

31.5.10

Bacon cups with gorgonzola & caramelized pears

When I first saw on the instructables website that you can make cute cups out of bacon I just knew I had to make them. Bacon might not be the healthiest option out there, but you can make an exception from time to time. Especially if used in such a creative way. And paired with a crunchy fresh salad.


Bacon cups for four

16 thin bacon strips

150g gorgonzola
2 pears
1 tbsp sugar
1 tbsp butter
some spinach leaves
toasted walnuts

Salad
4 gem lettuces
1 red shallot
2 tbsp walnut oil (or olive oil)
2 tbsp sherry
1 tbsp honey
1 tbsp vinegar
freshly ground black pepper
parsley

Probably the most intimidating part of this recipe is making the bacon cups. Well, don't worry, they will be ready before you realise. Now go and preheat your oven at 220°C.

Take a muffin tray (one made out of silicone is best) and turn it upside down. Wrap two strips of bacon around each cup, making sure you don't leave any big holes. Tuck the ends of the bacon strips inside - otherwise they will curl while cooking.

Place your muffin tray in a bigger oven tray (to prevent grease dripping all over) and pop in the oven for a few minutes. Watch closely. You want the bacon to brown, not to burn.

When your cups look appetising enough, take them out of the oven and let cool. Remove carefully from the muffin tray.


Slice the pears and sprinkle the tablespoon of sugar over them. This will help them caramelize more quickly. Heat the butter in a skillet, wait until it foams and add the pear slices. Saute until golden on both sides. Set aside.

Go back to the bacon cups now. Line each cup with a thin strip of spinach. Arrange some pear slices on the sides and fill with crumbled gorgonzola. Sprinkle toasted walnuts on top. Warm for two minutes in the oven, to soften the cheese.

For the salad, torn the lettuce and finely cut the shallot. Mix the rest of ingredients in a jar and give it a good shake. Toss everything together.

Arrange two bacon cups and salad on each plate and prepare to hear surprised "wows" from your guests.


P.S.: the flowers I used for decoration are nasturtiums. They're probably the easiest and quickest edible plants you can grow. I have some spare seeds if you're willing to give them a try.

This recipe makes 0.2kilos/person of pure goodness.

28.5.10

Chinese noodle salad

There's no asian soup or stir fry that doesn't scream for noodles. Noodles come in so many shapes, thicknesses, flavours and ingredients you can never get bored. But as summer approaches and the temperature outside is already scorching hot, boiling soup or firing woks is just out of the question.

But if you still fancy a dish full of chinese flavours, get cooking and make yourself this simple and tasty noodle salad.


Chinese noodle salad for four
1 pack of rice noodles
2 chicken breasts, cooked
1 cucumber
2 carrots
some spring onions
fresh coriander & mint

toasted peanuts


Sauce
4 tbsp peanut butter
4 tbsp soy sauce
1-2 tbsp sesame oil
1 tbsp chinese cooking wine or sherry
2 tbsp rice vinegar

1 tbsp brown sugar or honey
2 garlic gloves, finely cut
thumb sized piece of ginger, grated
1 tbsp water

Mix the ingredients for the sauce. It might look chunky at the beginning, so keep stiring until it becomes smooth. Add some water if it looks too thick. Put aside.

Soften the noodles in hot water or cook according to pack instructions. Let cool.

Finely cut the chicken breasts. Slice the cucumber, cut the carrots in thin sticks, chop the spring onions.

Mix noodles with the chopped ingredients and cover with the sauce. Sprinkle with herbs and peanuts.

Gulp.

This recipe makes 0.35kilos/person of pure goodness.

24.5.10

Dark chocolate & orange cake

You don't need a special occasion to pamper yourself with this luscious cake. And if you are actually preparing for a special occasion, don't waste your time in the kitchen: making this cake takes at most 1/2 hour.

The base of the cake is a quick chocolate fondant baked in the microwave. The internet is packed with chocolate fondant recipes but in my opinion the majority ask for too vast quantities of sugar or not enough chocolate... After many trials & errors, I ended up with one foolproof recipe that literally melts in your mouth. Total prep & baking time: 11 minutes!

The fondant is as delicious plain as it is with different kinds of flavours: caramelised ginger, chili, lavender, lemon... whatever your mood (or supplies).

Dark chocolate fondant for 6 or 8
200g dark chocolate
80g butter

3 eggs

50g flour

50g sugar
(for this particular cake swap the sugar for 3 tsbp orange marmalade)


Break the chocolate in small pieces. Place it in a microwave safe bowl together with the butter. Microwave on medium-low for about 1 minute or until the butter melts. Stir until the chocolate pieces dissolve completely.

In another bowl whisk the eggs with the sugar. Add the flour and whisk again. Incorporate the melted chocolate and butter.

Butter a cake dish and pour the mixture inside. Microwave on high for 4-5 minutes, until the center is set. The cake has to look moist, so be careful not to overbake it (in a microwave the cake won't burn, but turn into a rock hard useless thingy - even worse).

Let cool.

Orange ganache
150g dark chocolate

150ml double cream

1-2 tbsp Calvados, Grand Marnier or another strong alcohol


Chop the chocolate in pieces. Bring the cream to a boil. Take away from heat and stir in the chocolate. When it's completely melted, add the alcohol, cover with foil and refrigerate for at least 1 hour (or until spreadable).

Orange mascarpone filling
150g mascarpone (or soft cheese)
2 tbsp orange marmalade

Mix.

Before assembling the cake, choose a nice cake stand. Cut the chocolate fondant in two horizontally using a long knife and some skill. Spread the mascarpone between the two layers. Top the cake with a generous quantity of orange ganache and sprinkle some orange zest on top.

Chill until serving or indulge directly.

This recipe makes 0.2kilos/person of pure goodness.

21.5.10

Prosciutto & lemon roast chicken

Roast chicken is probably one of the most popular dishes to appear on "favorite food" lists. It's a favorite on our table too and every time I roast one I experiment with new flavours. Prosciutto will give your roast a deep earthiness and lemons a zingy fresh taste. Pair with rosemary and you already have a sophisticated chicken that will fill the house with a mouthwatering smell.


Prosciutto & lemon roast chicken for four
1 whole chicken
100g prosciutto
2 lemons
5 sprigs rosemary
1 glass of sherry (or white wine)
salt & pepper

Mustard mashed potatoes
8 floury potatoes
2 laurel leaves
1 tbsp thyme
butter
double cream
salt
4 tbsp grainy mustard (I ♥ La Maille)

Preheat your oven at 175˚C.

Lightly season the chicken with salt & pepper. Zest your lemons and juice one of them. Throw the prosciutto, lemon juice and zest in a food processor. Whizz until you obtain a smooth paste.

Now prepare to get a bit messy. Take the chicken and using your hand work your way under the skin of the breasts until you pull it apart from the meat. Continue towards the legs. Careful not to rip the skin.

Spread the prosciutto paste under the skin on the legs and breasts, trying to reach all the hidden spots. Place one sprig of rosemary on each leg and two on the breasts. Place your leftover whole lemon and rosemary in the cavity of the chicken. Fit the skin with a toothpick if it's too loose.

By stuffing the skin of the chicken you'll prevent the breasts from drying out while still enjoying perfect crisp skin.

Place your chicken in a roasting pan with the sherry or white wine. Pop in the oven for 1 1/2 hours, checking from time to time if the liquid has not dried out. Rest the chicken for 10 minutes before carving.

Owners of microwave ovens, don't despair: you too can prepare this roast. Put your chicken in an oven bag (unless you're up for cleaning splutter) and roast for 24 minutes on maximum power. You'll need to turn over the meat at half time. Though the skin will somehow get a nice golden color, you might want to brown the chicken in a pan with a little oil before you put in the oven.


While the chicken roasts, prepare the mashed potatoes.

Peel the potatoes, dice them and boil in salted water with laurel leaves and thyme. Mash them while still hot and add butter and double cream until you reach the perfect consistency. Stir in the grainy mustard and taste. Amazing, isn't it?

This recipe makes 0.4kilos/person of pure goodness.

17.5.10

Thai prawn salad

I know, it's the second salad that uses mango in only one week. The temptation is too strong as mango is such a versatile fruit you can use in any dish, from soups to roasts. It works brilliantly with thai flavours as you're about to find out.


Thai prawn salad for two
14 cooked prawns
bag of mixed salad leaves
1 mango (better unripe)
1 small cucumber

1 red onion
fresh herbs (mint, coriander, thai basil)
toasted peanuts

Dressing
2 tbsp lime juice
1 tbsp vegetable oil
1 tsp brown sugar
1 tbsp fish sauce (or soy sauce)

1 tbsp grated ginger
few drops of sesame oil
2 red chilis, finely cut

Mix the ingredients for the dressing in a small bowl. Place the prawns in the sauce to infuse with flavour while you prepare the salad.

Peel and cut the mango in thin slices. Using a vegetable peeler, cut the cucumber on its lenght in thin ribbons. Slice the onion. Chop the herbs. Mix everything with the salad leaves.

Arrange the prawns on top of the salad, pour the dressing and sprinkle with chopped peanuts.

Have a good time.


If you were wondering about the flowers: they come from my campanula portenschlagiana which is finally blooming. I'm so glad I can at last use its adorable (and edible!) flowers. Probably in two weeks time the first nasturtiums will open as well. Oh joy!


If you're thinking about using flowers in your kitchen, it's a good idea to check carefully if you are in a possesion of an edible variant. Avoid plants that grow on the side of the road and plants that were sprayed with chemicals. Unfortunately, it's the case with most plants from flower shops. But not all is lost: wait for them to bloom next year.

This recipe makes 0.3kilos/person of pure goodness.

15.5.10

Japanese salmon & avocado

If you never made sushi, or especially if you have and know how much trouble it is, go for this spectacular dish that delivers all the right flavours but is put together in less than 30 minutes. The combination of raw oily salmon and lemony avocados is just too good to be true.

Using extremely fresh fish is essential, so if you're not sure about its quality, skip this recipe. If your salmon smells fishy as well, it has certainly been dead for a too long time and you can, without regret, feed it to the garbage bin.

This is the right time to invest in a good quality soy sauce. Often it's the only ingredient you need to turn a dish into something special. I used Kikkoman until they changed the recipe making it completely tasteless. Fortunately I discovered Shoda, a japanese brand that uses non-GMO soy beans to produce their sauce and a very secret recipe that has a fabulous flavour.


Japanese salmon & avocado for two
2 ripe avocados
1 sushi-quality salmon fillet
2 tbsp soy sauce
2 limes, juiced
thumb sized piece of ginger
2 spring onions
fresh coriander leaves
1 tsp wasabi
salt

2 tbsp sesame seeds, toasted for 2 min in a pan without oil
1 red chili

Slice the salmon diagonally into smaller rectangular pieces. Finely grate the ginger and mix with the soy sauce and the juice from 1 lime. Pour over the salmon slices and marinate in the fridge for 20 minutes.

Peel & cut the avocados in small chunks. Sprinkle immediately with lime juice to prevent them turning brown. Add salt and wasabi to taste. Chop the coriander and 1 spring onion. Combine with the avocado.

Now you're ready to begin plating (if you're really hungry, skip this step and throw everything together on a plate - no need to be fancy everyday).

Place a cake metal ring on your serving plate and gently push inside half of the avocado mixture. Roll the salmon slices into flower shapes and arrange on top. Pour over a bit of the salmon marinade. Lift the ring. Sprinkle with finely cut spring onions, chilis and toasted sesame seeds. Repeat for the other plate.

Serve with sushi rice (if you can't find any, basmati is a good replacement) in which you mix 1 tbsp of sugar, 1 1/2 tbsp of rice vinegar & 1 tsp of salt.

This recipe makes 0.3kilos/person of pure goodness.

13.5.10

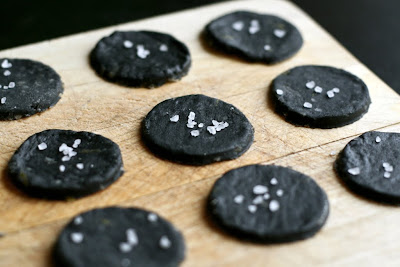
Black & white anchovy crackers

I like my food coloured and black must be the colour I fancy most. I've been fantasing about black pasta, black bread, even a black cake! The only ingredient missing from my cupboard was nero di seppia (squid ink).

I went through hell trying to find some in Brussels and finally brought a large supply from Italy. It would be a pity to give up baking these tasty crackers so do your best and ask in Italian restaurants or deli shops if they can provide you with some of the rare stuff.


Black & white anchovy crackers (~ 60 pieces)
120g all purpose flour
120g diced cold butter
70g grated parmesan
10 anchovy fillets in oil
1 teaspoon freshly ground black pepper
2 tablespoons chopped black olives
1 teaspoon squid ink
zest from one lemon
a little flour to dust
a little oil


Using a food processor mix the flour, butter, parmesan and finely cut anchovies until you obtain a smooth dough. Though you can do this by hand, it's important for the dough to remain cold if you want fluffy crackers in the end. If people often tell you have cold hands, don't worry about this and go ahead.

It's now time to divide the dough in two. You can leave half of it in the food processor bowl. Tip in the chopped black olives and 1/2 teaspoon black pepper. Mix. Now form the dough into a ball, cover with cling film and rest in the fridge for 15 minutes.

Take the other half of dough, place it in the food processor and mix with the squid ink, lemon zest and rest of black pepper. Cover and place in the fridge.

While you wait, preheat your oven at 200˚C.

Dust your work surface with flour and roll the dough to a 1cm thickness. Using a small cookie cutter or a small glass, cut your crackers. Form the leftovers into a ball and reuse until you finish the dough.

Place your crackers on oiled baking trays and bake for 6 minutes or until golden. Obviously the black crackers will never turn golden, so the trick is to mix the crackers and observe the right color on the white ones.

This recipe makes 0.1kilos/person of pure goodness.